Annotation Quality Control: How to Audit and Improve Image Labels
 Mostafa IbrahimPublished Oct 21, 2026

Annotation quality control means auditing labels before you train, because missed objects, wrong classes, and loose boxes teach a model the wrong thing. They can also make correct detections count as errors during evaluation. In Roboflow, save a baseline version first, then:
- tag flagged images and use Dataset Analytics and Dataset Search to find missing labels
- fix the errors in the annotation editor
- generate a reviewed version to compare against the baseline
For future batches, have a second reviewer check a random sample against a set error-rate limit.
A missed scratch, a reflection labeled as a dent, or a bounding box covering too much background can introduce errors into a computer vision dataset. Those mistakes impact both what a model learns and how its predictions are evaluated. Annotation quality control helps you identify and correct them before using the labels for training or testing.
An effective review needs clear annotation rules, a consistent way to record errors, and a verification step to confirm that corrections meet those rules.
In this tutorial, we’ll use Roboflow to audit 50 steel surface images labeled for scratches and dents. We’ll establish review criteria, inspect annotations, use dataset statistics to investigate potential issues, and correct confirmed errors. Finally, we’ll verify the changes and create a reviewed dataset version, with a process you can apply to future annotation batches.
What Is Annotation Quality Control?
Annotation quality control is the process of reviewing data labels against defined guidelines, identifying errors, and verifying corrections. For image datasets, it checks whether annotations accurately describe the objects or regions a computer vision model needs to recognize.
For object detection, annotation quality control covers four areas:
- Correctness: Each annotation uses the appropriate class. A scratch should be labeled as a scratch, and a reflection should not be labeled as a defect.
- Completeness: Every object required by the annotation guidelines is labeled. An image with three distinct scratches should not contain a box around only one.
- Localization: Each bounding box follows the project’s boundary rules, enclosing the intended object without unnecessary background.
- Consistency: Annotators and reviewers apply the same rules across images, including how to handle overlapping objects, unclear boundaries, and partially visible defects.
Annotation quality assurance and quality control serve related purposes. Quality assurance establishes the guidelines, reference examples, and annotator training that help prevent mistakes. Quality control checks the resulting annotations and confirms that identified mistakes have been resolved.
The outcome is a documented review: which images were checked, what errors were found, what changed, and whether the corrected labels meet the project’s requirements.
Annotation Quality Control in Roboflow
Follow these steps to audit image annotations in Roboflow, correct labeling errors, and verify the changes before creating a dataset version for model training.
Step 1: Prepare a Steel Defect Dataset for Quality Control
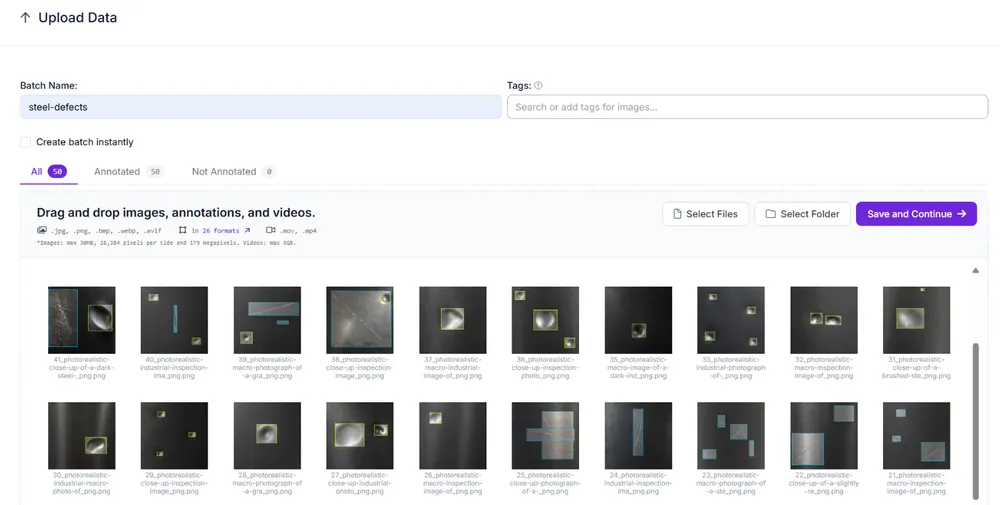
For this tutorial, we'll use a local dataset of 50 steel surface images with existing bounding-box annotations for two classes: scratch and dent. The number of visible defects varies across the images, with some steel surfaces showing no damage.
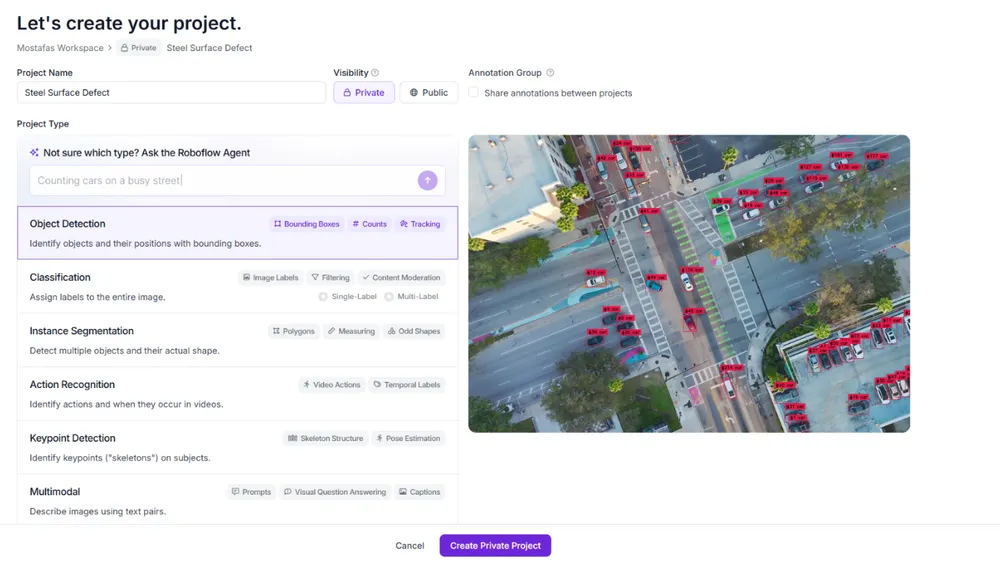
Start by creating an Object Detection project (opens in a new tab) in Roboflow named Steel Surface Defect.
Open Upload Data (opens in a new tab) and drag in the folder containing the images and their annotations. Once Roboflow processes the files, enter steel-defects as the Batch Name. Check that all 50 images appear under Annotated, with none under Not Annotated, then click Save and Continue.
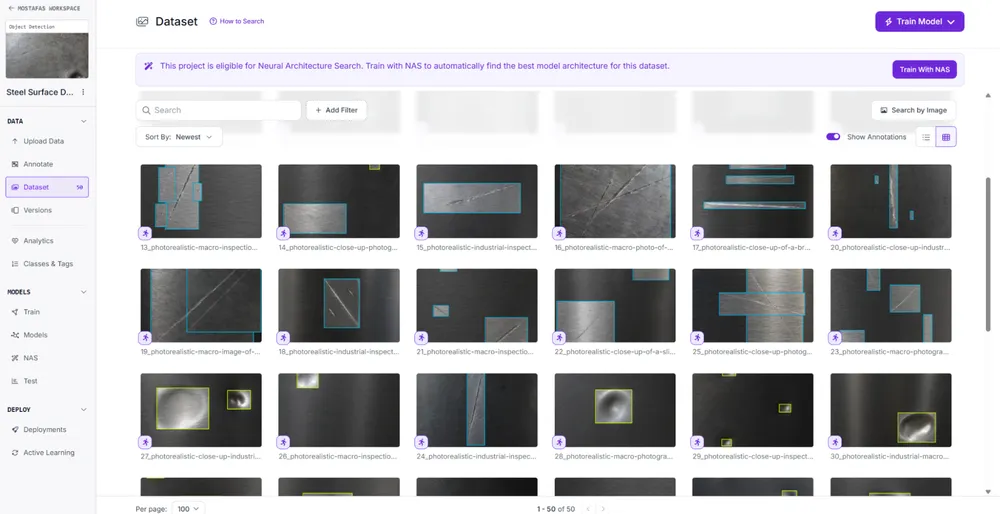
Choose a dataset split that suits your project, then click Continue and open Dataset. Enable Show Annotations to inspect the existing bounding boxes. Pay particular attention to thin scratches that blend into the steel texture and dents that can be mistaken for reflections.
Before making any corrections, open Versions (opens in a new tab) and click Create New Version. Name it Steel-defects-baseline and confirm that it contains 50 images, two classes, and zero unannotated images. Leave preprocessing and augmentation disabled, then click Create.

This creates Version 1, preserving the original annotations for comparison with the reviewed dataset.
Step 2: Establish Annotation Rules and Audit the Dataset
Before reviewing the images, establish clear rules for evaluating each annotation:
- Class labels: Confirm that each defect is correctly labeled as scratch or dent.
- Bounding boxes: Make sure each bounding box fits closely around the defect.
- Missing annotations: Look for visible defects that have not been labeled.
- Duplicate annotations: Make sure the same defect has not been annotated more than once.
When scratches cross or overlap, check whether you can identify each scratch separately. If you can, draw a bounding box around each one, even if the boxes overlap.
Review all 50 images using these rules. Apply the qc-needs-fix tag (opens in a new tab) when you find an annotation problem so you can return to that image later.
During the review, we flagged seven images with possible labeling errors. Some dent boxes were too large, while one box marked a dent that was not visible. We also found a scratch with no bounding box. In a few images, overlapping scratches were grouped inside one box and needed another look.
To view the flagged images together, click Add Filter and select the qc-needs-fix tag. The seven flagged images will appear in the filtered results.

Step 3: Check Dataset Health with Roboflow Analytics
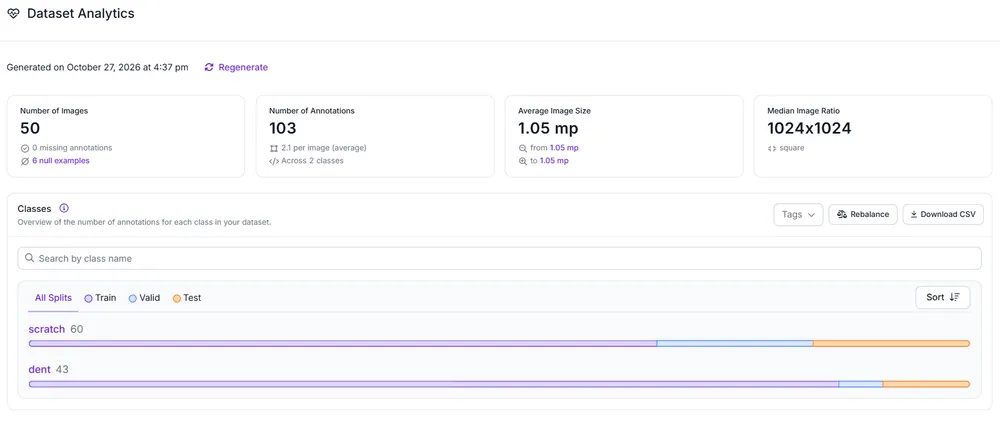
After reviewing individual images, use Roboflow's Dataset Analytics (opens in a new tab) to check how annotations are distributed across the dataset. Open the Analytics tab in your project to view the available statistics.
Start by checking the class distribution. Our dataset has 60 scratch annotations and 43 dent annotations. If the defects were counted separately before annotation, compare those records with the Analytics results. Differences may point to missing or incorrectly labeled defects that need further review.
Dataset Analytics also reports six null examples. Null examples are images marked as containing no scratches or dents.
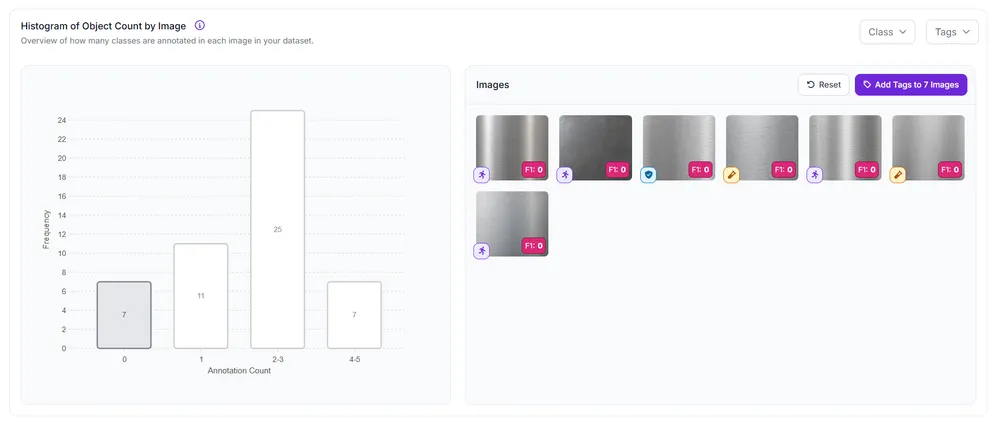
Next, examine the Object Count Histogram, which shows how many objects are labeled in each image. Pay attention to images with no annotations. Some steel surfaces genuinely contain no defects, while others may have scratches or dents that were missed.
The Annotation Heat Map shows where bounding boxes are most placed across the dataset. Roboflow combines the annotation locations from all 50 images into one map. Red areas have more annotations, while blue areas have fewer. In our dataset, most annotations appear toward the upper-right. Drag over an area of the heat map to display images with annotations in that region.
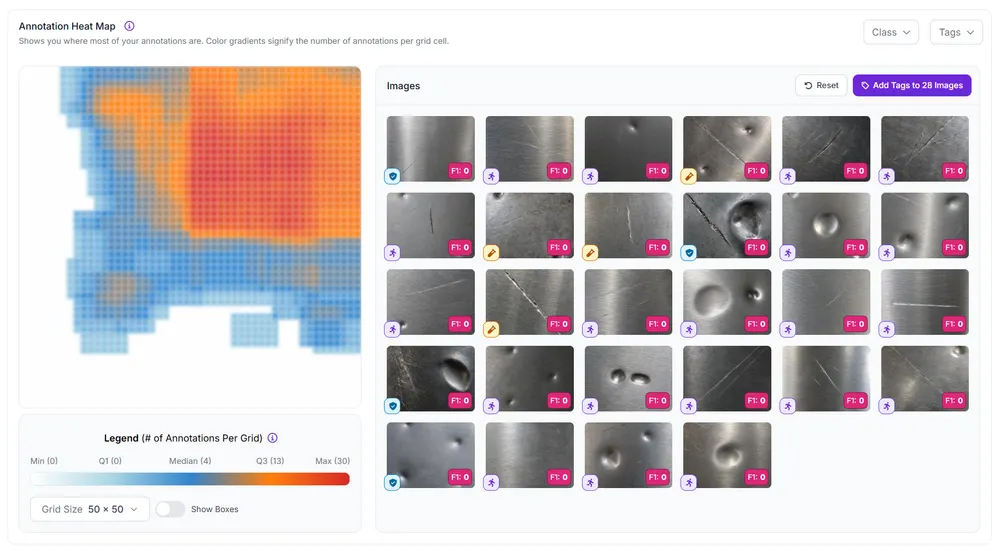
Counts, histograms, and heatmaps like these come from Roboflow’s Dataset Health Check (opens in a new tab). They highlight patterns worth investigating, but reviewers still need to inspect the images to confirm labeling errors. An unannotated image still needs labeling or review, while a null example has been reviewed and marked as containing no target defects. Images with existing bounding boxes can also have scratches or dents that were missed during annotation.
Step 4: Correct Annotation Errors and Track Changes in Roboflow
Open an image tagged qc-needs-fix in Roboflow's annotation editor. Here, you can adjust existing bounding boxes or add annotations for missed defects.
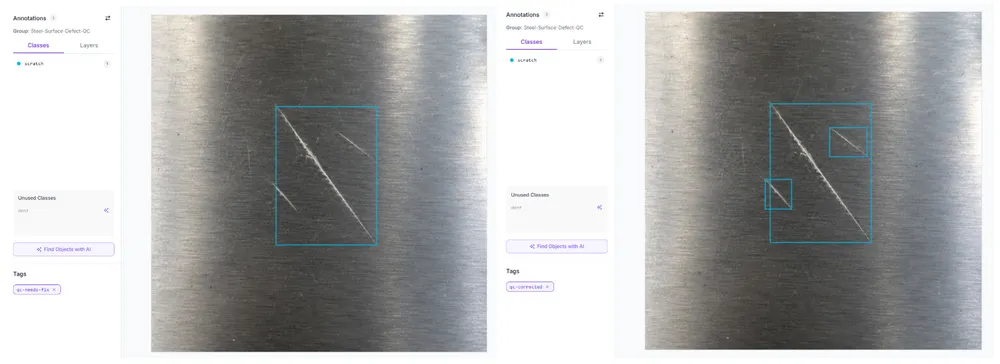
In our first example, one large box covered a long scratch and two smaller scratches nearby. We kept the original box unchanged and added separate boxes around the two smaller scratches. Some boxes overlap because the scratches are close together.
The second example needed a simpler correction. The original dent box covered too much undamaged steel, so we resized it to fit more closely around the dent. The scratch annotations in that image were left unchanged.
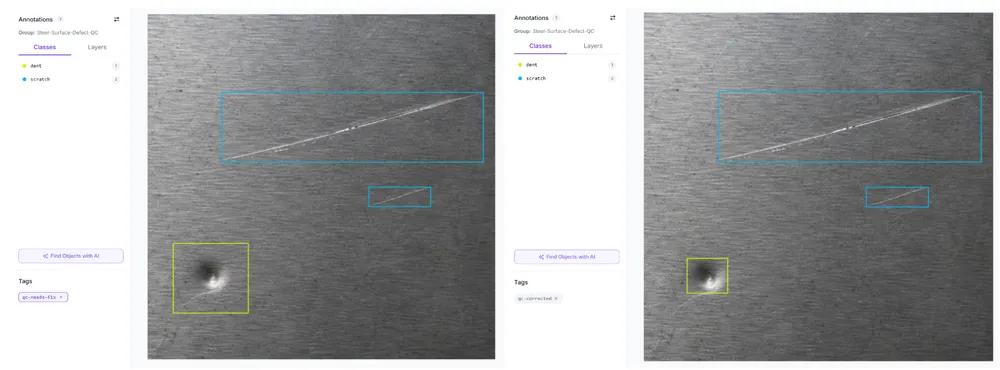
You can fix other errors using the editor. If a defect has no annotation, select the Bounding Box tool (opens in a new tab) and draw a box around it. Assign the appropriate class before saving. For an incorrect class, select the existing annotation and change its label. We also deleted the large dent box identified during the audit because no dent was visible. Remove duplicate boxes when the same defect has been annotated more than once.

After correcting an image, return to Dataset and update its tags. Remove qc-needs-fix and apply qc-corrected to show that the changes are complete.
Step 5: Verify Corrections and Create a Reviewed Dataset Version
After saving the corrections, open Dataset and filter by the qc-corrected tag. Reopen each image to confirm that the changes were saved properly. Check the full image rather than focusing only on the edited area, as nearby annotations may have been accidentally changed. Make sure the bounding boxes fit the defects and the class labels are correct. Once an image passes this check, apply the qc-verified tag.
Before generating Version 2, return to Dataset and filter by the qc-needs-fix tag to find any unresolved issues. Resolve any issues you find before creating the reviewed dataset version.
Record the Audit Findings
After completing the review, record how many images contained confirmed errors and what corrections were made.
| Audit result | Value |
|---|---|
| Total images reviewed | 50 |
| Images flagged for possible errors | 7 |
| Images with confirmed errors | 7 |
| Missing annotations added | 3 |
| Bounding boxes adjusted | 6 |
| Incorrect or duplicate boxes removed | 1 |
| Corrected images passing verification | 7 |
| Total annotations in reviewed dataset | 105 |
An image may contain several annotation errors, so the number of individual corrections can be higher than the number of affected images. Recording the filename and correction type for each image makes it easier to revisit the findings later.
Create Version 2
With the review complete, open Versions and select Create New Version. Name it steel-defects-reviewed, keep the same dataset split as Version 1, and leave preprocessing and augmentation disabled.
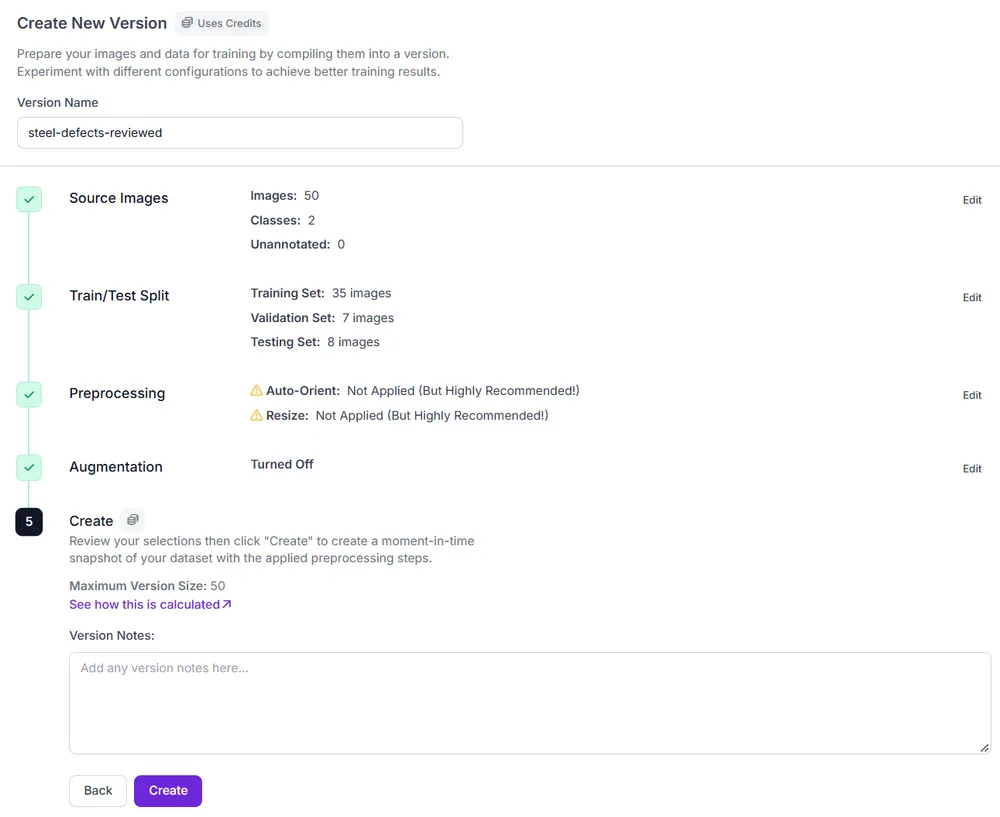
Click Create to generate Version 2. Once it's ready, confirm that all 50 images and both classes are included.
Step 6: Apply Quality Control to Future Annotation Batches
For future annotation batches, establish a sampling rule and an acceptable error rate before reviewing the labels. This gives you a consistent way to decide whether a batch needs more work without inspecting every image.
For example, randomly select 20 images from a batch of 100 and set a maximum error rate of 5%. Count each sampled image once if it contains one or more confirmed annotation errors. If two of the 20 images contain errors, the error rate is 10%, exceeding the limit. The batch should be returned for correction or a more extensive review.
Choose a threshold and sample size based on the consequences of incorrect annotations. Small batches or safety-critical applications may require reviewing every image.
Have a second person review the sampled images instead of relying on the original annotator to check their own work. The reviewer should record labeling errors and use the error-rate threshold to decide whether the batch passes. If the reviewer is unsure whether an annotation is correct, they should use the annotation guidelines before recording it as an error.
You can also use Roboflow Dataset Search (opens in a new tab) to look for images with missing annotations. Try these queries:
- scratch -class:scratch: Finds images that may contain scratches but have no scratch annotations.
- dent -class:dent: Finds images that may contain dents but have no dent annotations.
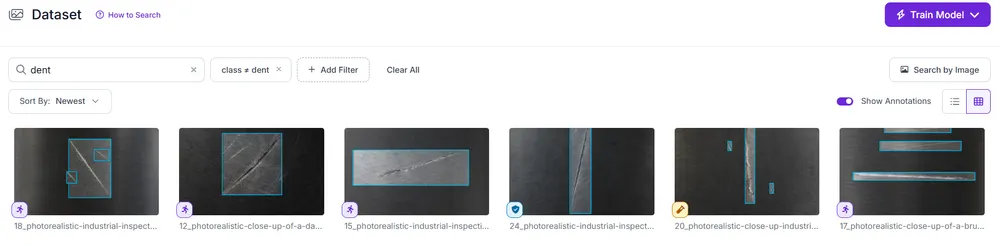
Check the results manually. In our steel dataset, some search results showed surface textures and reflections rather than actual defects. Use Dataset Search to identify images worth reviewing rather than assuming every result contains a missing annotation.
Conclusion
Our audit of 50 steel surface images found labeling errors in seven images. We added three missing annotations, adjusted six bounding boxes, and removed one incorrect dent annotation.
You can follow the same process to audit an existing dataset in Roboflow. To measure the effect of these corrections, train the same model on both dataset versions using consistent settings. Evaluate both models on the same independently reviewed test set, keeping its images and labels unchanged.
Further Reading: