How to Turn Videos in S3, GCS or Azure into a Computer Vision Dataset
 Erik KokaljPublished Nov 12, 2026

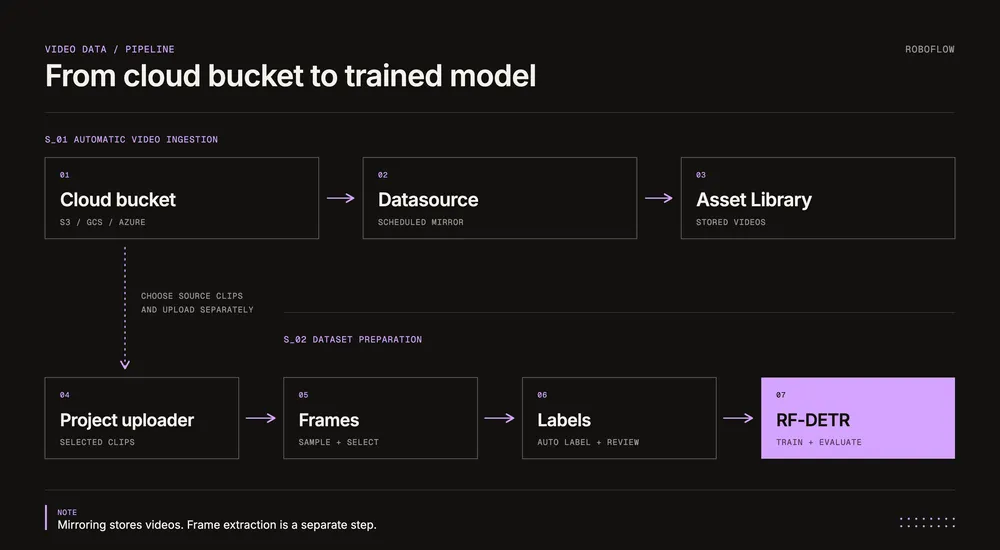
To label video data from S3, GCS, or Azure, connect your bucket to a Roboflow datasource and enable scheduled mirroring for MP4 and MOV files up to 3 GB each. Then use a separate frame-sampling step to prepare images, review their labels in Roboflow, and train an RF-DETR model on the resulting dataset.
To label video data from S3, connect your bucket to a Roboflow datasource, mirror selected videos into your workspace, and prepare representative frames for annotation. Review the labels, create a dataset version, and train an RF-DETR model for your application.
For enterprise teams, this process needs to work across cameras, locations, and changing operating conditions. A manufacturing team may need examples from several production lines; a logistics team may need footage from multiple facilities. Roboflow datasources provide a recurring connection to that footage using saved credentials, file filters, and scheduled syncing.
Roboflow Datasources (opens in a new tab) adds MP4 and MOV video mirroring from AWS S3, S3-compatible storage, Google Cloud Storage, and Azure Blob Storage. Mirrored videos are stored in the Asset Library; extracting frames and preparing a labeled training dataset are separate steps covered below.
How to Label Video Data from S3, GCS, and Azure
Your cameras may already collect the examples your model needs. Security cameras record people moving through a warehouse. Line cameras capture products under inspection. Dashcams record changing road conditions. That footage often ends up in cloud storage, and moving it from a bucket into a labeling tool takes extra work.
One minute of video at 30 frames per second contains 1,800 frames. Label every frame, and you can spend most of your time annotating almost identical views. Download a few clips once, and your dataset misses the footage that arrives tomorrow.
A custom pipeline can download videos, extract frames, and upload images to a labeling tool. Keeping that pipeline running also means handling new files, retries, credentials, and duplicate imports. Adding a second cloud provider introduces another integration to maintain.
Roboflow datasources handle the recurring cloud-to-workspace import. You can focus your dataset work on selecting useful scenes and labeling what the model needs to learn.
What Is a Roboflow Datasource?
A Roboflow datasource is a saved connection between your cloud storage and your Roboflow workspace. It combines a bucket or container, a reusable credential, file-selection rules, and a sync configuration. With scheduling enabled, Roboflow checks for matching data automatically.
The connection now supports videos alongside images. You can find and manage the mirrored footage in the Asset Library (opens in a new tab), which organizes visual data across your workspace.
For object detection, the next unit of training data is a labeled image. Select useful clips, extract representative frames, and create a dataset around the task you want to solve.
Supported Cloud Storage and Video Formats
Roboflow supports the following providers for video mirroring:
|
Storage provider |
Supported video files |
Maximum size per file |
|
AWS S3 |
MP4 and QuickTime (.mov) |
3 GB |
|
S3-compatible storage |
MP4 and QuickTime (.mov) |
3 GB |
|
Google Cloud Storage |
MP4 and QuickTime (.mov) |
3 GB |
|
Azure Blob Storage |
MP4 and QuickTime (.mov) |
3 GB |
These limits apply to mirroring the video files. A training dataset still requires frame selection and annotation. Split files larger than 3 GB into smaller clips before syncing them.
Plan Data Access and Annotation Review
Before connecting production footage, define which buckets and camera locations belong in the dataset, who can access the imported data, and who approves annotations before training.
Use a dedicated cloud identity with read access scoped to the required bucket or container. Scope the cloud identity’s permissions to the bucket or container you need, then use file filters to choose which videos within it Roboflow imports.
Within Roboflow, role-based access controls (opens in a new tab) let you separate labeling and review responsibilities. Enterprise options include custom roles and folder permissions for more specific access requirements. Audit logs (opens in a new tab) record significant workspace actions, including image approvals, dataset exports, and training activity.
For datasets spanning several facilities, define a shared labeling policy and preserve source information such as site, camera, capture time, and product type. That context helps reviewers resolve ambiguous examples and helps engineers investigate differences in model performance.
Step 1: Connect your bucket
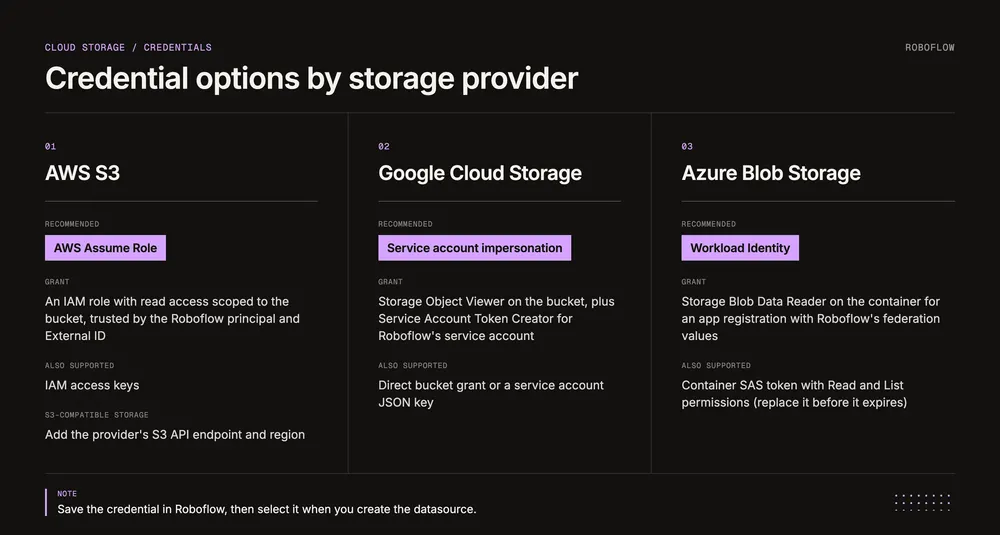
Start in your workspace’s Credentials settings and save access for your storage provider. Then create a Datasource. On its Connection tab, choose the provider, supply the bucket details, and select your saved credential.
Use the bucket or Azure container name without a folder path. You will narrow the selection with file filters in Step 2.
AWS S3
For an S3 video dataset, Roboflow recommends AWS Assume Role. Create an IAM role with bucket-scoped read access, and configure its trust policy using the Roboflow principal and External ID shown in the credential form. Save the role ARN in Roboflow, then select it for your datasource.
IAM access keys are also supported. Follow the AWS S3 credential setup (opens in a new tab) for the required policies and credential options.
For S3-compatible storage, also supply the provider’s S3 API endpoint and region. Follow the S3-compatible configuration instructions (opens in a new tab) for endpoint and addressing requirements.
Google Cloud Storage
For Google Cloud Storage video labeling, use Roboflow’s recommended service account impersonation option. Create the service account with the exact name shown in Roboflow, grant it Storage Object Viewer on your bucket, and allow Roboflow’s displayed service account to impersonate it with Service Account Token Creator. Save the service account email in the credential form.
Roboflow also supports a direct bucket grant and service account JSON keys. The GCS credential guide (opens in a new tab) covers each option.
Azure Blob Storage
For Azure Blob video labeling, use Workload Identity for a connection without a stored client secret. Configure an app registration with the federation values shown in Roboflow, grant it Storage Blob Data Reader on the container, and save its tenant and client IDs. Your datasource also needs the storage account and container details.
A container SAS token with Read and List permissions is another option, but it must be replaced before it expires. Follow the Azure credential guide (opens in a new tab) for the complete setup.
Step 2: Choose which videos to sync with glob patterns
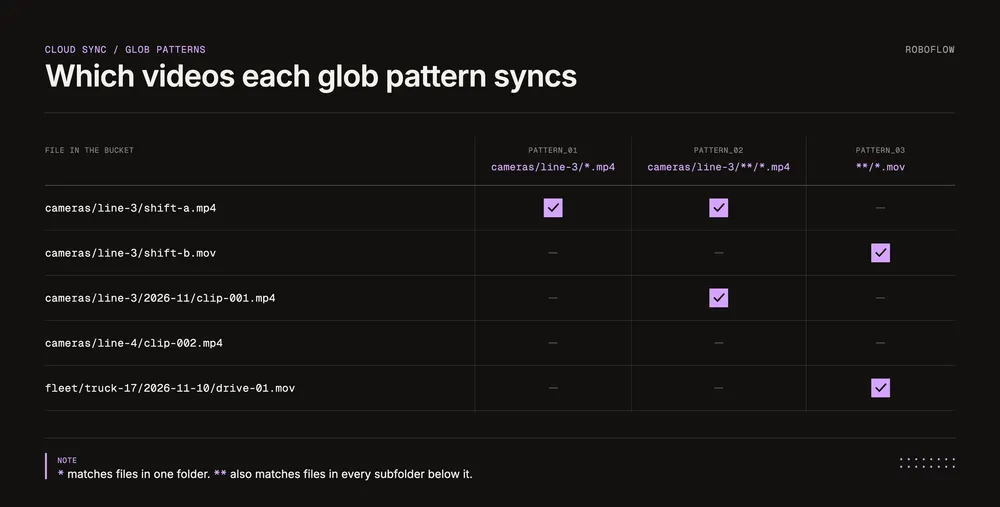
Open File Filters under Mirror Configuration. A glob pattern selects files by their paths and names: * stays within one directory level, while ** can span subdirectories.
|
Example pattern |
Videos to include |
|
cameras/line-3/*.mp4 |
MP4 files directly inside the line-3 folder |
|
cameras/line-3/**/*.mp4 |
MP4 files throughout the line-3 subtree |
|
**/*.mov |
MOV files across the bucket |
|
fleet/truck-17/**/*.mp4 |
MP4 footage for one vehicle |
Start with one camera, production line, or route. A narrow selection makes the first import easier to inspect and limits unnecessary data transfer, storage, and downstream labeling work.
For example, a missing-part detector should start with footage where the relevant assembly is visible. Skip long stretches of an empty conveyor, since they contain few useful examples. Expand the selection when you know which conditions your model still needs to see.
Step 3: Set a sync schedule
Under Mirror Configuration, open Scheduling and enable the daily schedule. It runs every 24 hours and is off by default. You can also start a manual sync from the datasource list.
Check the first import in the Asset Library before expanding your selection. Confirm that the clips come from the intended camera and that the relevant files appear.
New matching footage can now join your workspace without repeated manual video uploads. Your training dataset grows when you select frames from that footage, review their annotations, and include them in a new dataset version. Add new footage when it covers conditions your model has not seen yet, such as a new shift, product variant, or camera angle.
Step 4: Sample frames from your videos
Bucket mirroring and frame extraction are separate steps. To build a first object detection dataset with the documented web uploader, download a small selection of source clips, open an Object Detection Project, and add those clips through Upload Data. The video extraction dialog (opens in a new tab) lets you set an interval, trim the range, and select individual frames.
Choose the sampling rate based on how quickly useful information changes. For a one-minute clip:
|
Sampling rate |
Approximate frame count |
When to try it |
|
1 frame every 5 seconds |
12 |
Slowly changing scenes or a first review |
|
1 frame per second |
60 |
A starting point for scenes with moderate movement |
|
5 frames per second |
300 |
Short events that need closer inspection |
|
30 frames per second |
1,800 |
Frame-by-frame analysis when the task requires it |
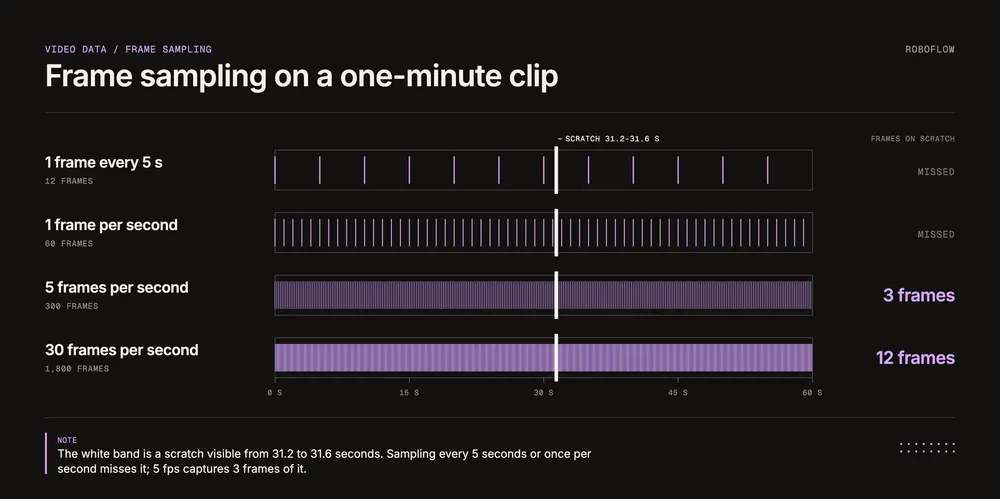
Treat these rates as starting points. A defect visible for a fraction of a second can fall between samples. Review representative clips, increase sampling around brief events, and select rare examples manually when necessary.
Choose diversity across clips as well as within them. Include different shifts, lighting, camera angles, product variants, and normal scenes where the target is absent. If two frames teach the model essentially the same thing, keeping both may add labeling work with little benefit.
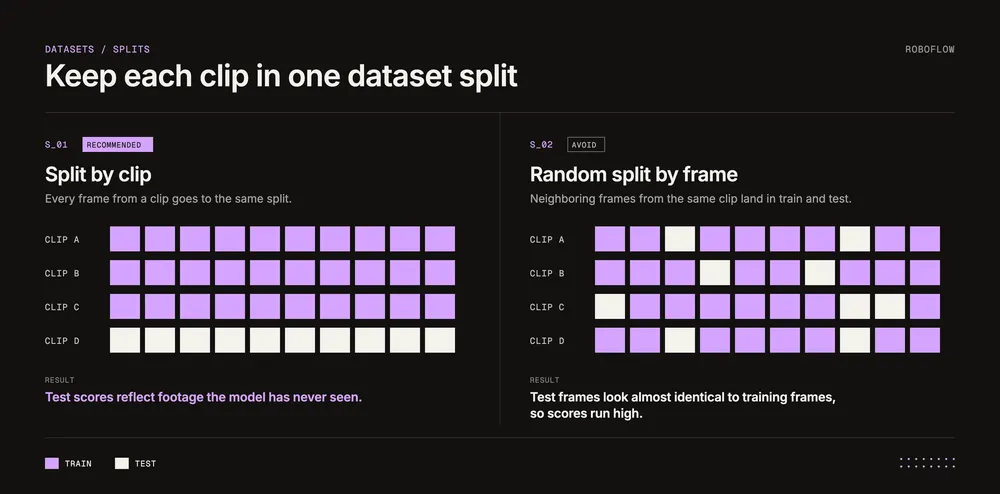
Keep frames from the same clip or continuous recording session in the same train, validation, or test split. Randomly distributing neighboring frames can make evaluation look better than performance on genuinely new footage.
If a clip fails to open in the uploader, check its codec. An MP4 or MOV extension does not guarantee browser decoding support; converting a problematic clip to H.264 MP4 can help.
Step 5: Label faster with Auto Label and Roboflow Annotate
Define the labels before annotating. For a line inspection project, that might mean scratch, dent, and missing-fastener. Write down what qualifies as each defect and how to handle partial visibility or ambiguous cases.
Use Roboflow Annotate to create and correct annotations. Auto Label (opens in a new tab) can generate an initial set of labels, which you then inspect and refine. If your task requires several models or filtering rules, you can also use Workflows within Auto Label.
Open Auto Label for your image batch, choose a labeling model, and enter the class names and visual descriptions. Preview the results on both easy and difficult frames. Adjust the descriptions or labeling approach until the preview matches your definitions, then run the job on the batch.
During review, look for:
- Objects or defects the labeling model missed.
- Boxes or masks that include the wrong area.
- Different class names used for the same visual condition.
- False labels on reflections, shadows, or normal product features.
Review the labels across camera locations and operating conditions, not just the clearest images. Keep useful negative examples too: a frame with no defect helps define what normal production looks like.
Step 6: Train RF-DETR and deploy your model
Create a dataset version once the frames and annotations are ready. A version captures the data and preparation settings used for that training run, so you can compare later changes against a known baseline.
Start a training job, choose RF-DETR, and select a model size for your application. Roboflow Train runs training in the cloud. Follow the RF-DETR training guide for the full process.
Evaluate the result on held-out footage. For defect detection, inspect missed defects as well as false alarms. For people counting, test crowded scenes, partial occlusions, and empty areas. Measure inference speed against the application’s requirements alongside prediction quality.
Choose a deployment approach that fits where the application will run. Roboflow’s managed cloud services support applications that send images for inference, while Batch Processing runs Workflows across recorded images and videos. For connected deployments on supported edge hardware, Roboflow Deployment Manager gives enterprise teams a central place to configure deployments, deliver updates, and monitor devices across locations.
To apply your trained model to stored footage, continue with How to Analyze a Folder of Videos from AWS S3.
For manufacturing teams, connecting the bucket is the data-ingestion stage of an MLOps workflow for visual inspection. The next stages are selecting examples, reviewing labels, evaluating model changes, and deploying an approved version.
Roboflow Datasources vs. DIY Scripts vs. SageMaker Ground Truth
The choice depends on how much of the data pipeline you want to operate yourself. Roboflow provides recurring imports across supported cloud providers and connects dataset work to labeling, training, and deployment.
|
Capability |
Roboflow datasources and platform |
DIY scripts |
SageMaker Ground Truth |
|
Setup |
Save a credential and configure a datasource |
Build access, file discovery, retries, and uploads |
Configure S3 inputs, IAM access, a labeling job, and workers |
|
Ongoing ingestion |
Built-in daily bucket mirroring |
Build scheduling or event triggers |
API streaming labeling jobs can receive new objects; you configure delivery |
|
Multi-cloud sources |
S3, S3-compatible, GCS, and Azure |
Depends on the integrations you build |
Labeling inputs use S3; move external data there first |
|
Frame sampling |
Separate Project video uploader; mirroring itself does not extract frames |
Implement with a video-processing tool |
Automated setup can extract frames from S3 videos at a chosen interval |
|
Path to training |
Label frames, version the dataset, and train RF-DETR in Roboflow |
Connect outputs to a labeling tool and training stack |
Use labeled outputs in a separate training job |
Ground Truth does support automatic video frame extraction (opens in a new tab) and streaming labeling jobs (opens in a new tab). As of November 2026, AWS states that Ground Truth is no longer open to new customers (opens in a new tab); existing customers can continue using it.
Choose Roboflow when you want scheduled imports from multiple storage providers and a platform for turning selected frames into a deployed vision model. Choose custom scripts when specialized extraction rules justify maintaining that code.
Next Steps to Turn Video into Production Vision AI
Video stored in S3, Google Cloud Storage, and Azure can provide the examples your models need to recognize defects, count inventory, and monitor operations. Roboflow connects that footage to a platform for organizing visual data, reviewing annotations, training a model, and deploying vision applications.
Start with a defined operational use case and representative footage from one site. Establish who can access the data, how labels will be reviewed, and which accuracy and latency requirements the application must meet. Use those results to guide expansion across cameras, production lines, or facilities.
Talk to the Roboflow team about connecting your cloud storage, designing your labeling workflow, and deploying computer vision within your organization’s infrastructure and security requirements.

