What Is ResNet?
 Timothy MPublished Oct 4, 2026
ResNet (residual network) is a family of convolutional neural networks introduced by Microsoft Research. It uses skip connections to combine learned residuals with features from earlier layers. This made networks with 100+ layers easier to train. ResNet remains a practical baseline for image classification and a backbone for object detection and segmentation. You can train and deploy ResNet models on your own data in Roboflow.
Imagine a student following a more detailed study plan but getting lower scores, even on practice tests. Deep neural networks once faced a similar problem. Adding more layers should have helped them learn richer features. Yet plain networks showed higher training error as their depth increased. A plain network simply stacks layers with no skip connections.
ResNet addressed this problem with a simple idea called residual learning. A skip connection carries the input around a block's layers. The block adds the input back to the learned residual. This made much deeper networks easier to train. The researchers trained a 152-layer network on ImageNet and explored a 1,202-layer network on CIFAR-10.
The idea also appears in transformers, which add a residual connection around their multi-head self-attention and feed-forward sub-layers. ResNet itself remains useful for practical computer vision tasks, such as classifying banana ripeness and classifying defects in juice box packaging.
This guide explains what ResNet is, how it works, how its variants compare, and how to train and deploy it in Roboflow.
What ResNet Is?
Before looking at how ResNet works, it helps to know where it came from and why it became so popular. ResNet, short for residual network, is a family of convolutional neural networks (CNNs) built by stacking residual building blocks, often just called residual blocks. It was introduced by Kaiming He, Xiangyu Zhang, Shaoqing Ren, and Jian Sun at Microsoft Research in the paper Deep Residual Learning for Image Recognition.
ResNet made a strong debut. An ensemble of ResNets, which combines the predictions of several models, won first place in the classification task of the ImageNet Large Scale Visual Recognition Challenge (ILSVRC) with a top-5 error of only 3.57% on the test set. Top-5 error counts how often the correct label is missing from the model's top five predictions.
The same networks also took first place in ImageNet detection, ImageNet localization, COCO detection, and COCO segmentation. The paper went on to win the Best Paper Award at CVPR, and a Nature analysis later named it the most-cited paper of the twenty-first century.
ResNet comes in five standard depths, ResNet-18, ResNet-34, ResNet-50, ResNet-101, and ResNet-152, where the number is the count of weighted layers, meaning the layers with learnable weights. Pretrained ImageNet weights for all five are ready to use in libraries like torchvision, which makes ResNet a common starting point for image classification and transfer learning, where a pretrained model is reused for a new task.
The Problem ResNet Solved
You might expect a deeper network to always perform better, since more layers can learn richer features. In practice, as more layers were added to a plain convolutional network, its accuracy saturated and then degraded, even on the training data, and this is known as the degradation problem.
A clear example comes from ImageNet, measured with top-1 error, which is how often the model's top prediction is wrong. On the validation set with 10-crop testing, a plain 34-layer network had a top-1 error of 28.54%, which is worse than the 27.94% of a plain 18-layer network.
This was not overfitting, which happens when a model does well on its training data but poorly on unseen data, because the deeper network was worse even on its training data. Vanishing gradients, where the gradient shrinks toward zero as it is backpropagated through many layers, were also an unlikely cause, since these networks used batch normalization (BN) and their gradients kept healthy norms.
The real issue was an optimization difficulty. In theory, a deeper network has a solution by construction, where its added layers are identity mappings that pass their input through unchanged and the other layers are copied from the shallower model, so its training error should be no higher than that of its shallower counterpart. Yet the solvers, such as stochastic gradient descent (SGD), could not find solutions that were as good, or could not find them in feasible time.
ResNet addressed this with residual learning, and the 34-layer ResNet then reached a top-1 error of 25.03%, the lowest of the four networks compared.
How Residual Blocks Work
Residual blocks are the core building unit of ResNet. Every ResNet from ResNet-18 to ResNet-152 is built by stacking these blocks one after another. Once you understand one block, the rest of the architecture is easy to follow.
A residual block is a small group of stacked layers with a shortcut connection around it. Instead of learning the full output, the layers learn only a residual function F(x). The shortcut then adds the input x back to it.
Here Wᵢ are the weights of the stacked layers, and a ReLU is applied after the addition. If an identity mapping is optimal for a block, training can drive the weights of its layers toward zero. F(x) then becomes close to zero, and the block simply passes x forward. This is like making small edits to a draft instead of rewriting it.
The shortcut in this equation is an identity shortcut. It adds no extra parameters and works when x and F(x) have the same feature map size and dimensions. It also lets gradients skip the stacked layers during backpropagation, which helps make deep residual networks easier to optimize.
When the dimensions increase, ResNet has two options. It can fill the extra dimensions with zeros, which is called zero-padding. It can also use a projection shortcut, which multiplies x by a linear projection Wₛ to match the dimensions.
In practice, Wₛ is a 1×1 convolution that is only used when matching dimensions. Identity shortcuts are used everywhere else because they are enough to address the degradation problem and are more economical. The diagram below shows both block types with identity shortcuts.

Both blocks in the diagram follow the same pattern. The layers learn F(x) while the identity shortcut carries x, and the two are added before the final ReLU.
Basic Block in ResNet-18 and ResNet-34
The basic block stacks two 3×3 convolutions with the same number of filters. Batch normalization (BN) follows each convolution. One ReLU comes after the first BN, and another comes after the addition.
Bottleneck Block in ResNet-50, ResNet-101, and ResNet-152
The bottleneck block uses three convolutions instead of two. A 1×1 convolution first reduces the dimensions, for example from 256 to 64. A 3×3 convolution then processes this lower-dimensional feature map, and a final 1×1 convolution restores the dimensions. Because this 3×3 layer works with smaller input and output dimensions, it forms the bottleneck of the block.
This design keeps very deep networks computationally efficient. ResNet-50 has 50 layers but needs only 3.8 billion FLOPs (multiply-adds) per image. That is close to the 3.6 billion of ResNet-34.
Both blocks learn a residual function, but they suit networks of different depths. The basic block keeps smaller ResNets simple. The bottleneck block makes deeper ResNets more economical than stacking basic blocks.
ResNet Variants Compared
Picking a ResNet is mostly a trade-off between speed and accuracy. Among the five standard variants, the smaller ones have lower latency and run on modest hardware, while the deeper ones reach higher accuracy but need more compute. This section compares them side by side to help you choose.
All five ResNet variants follow the same design and differ only in depth and block type. ResNet-18 and ResNet-34 use basic blocks, while ResNet-50, ResNet-101, and ResNet-152 use bottleneck blocks.
| Variant | Layers | Parameters | Block type | When to pick it |
|---|---|---|---|---|
| ResNet-18 | 18 | 11.7M | Basic, [2, 2, 2, 2] | Limited hardware, small datasets, and quick experiments |
| ResNet-34 | 34 | 21.8M | Basic, [3, 4, 6, 3] | Higher accuracy than ResNet-18, still fast |
| ResNet-50 | 50 | 25.6M | Bottleneck, [3, 4, 6, 3] | A strong default for classification, transfer learning, and backbones |
| ResNet-101 | 101 | 44.5M | Bottleneck, [3, 4, 23, 3] | Higher accuracy than ResNet-50, and backbones for detection or segmentation |
| ResNet-152 | 152 | 60.2M | Bottleneck, [3, 8, 36, 3] | The highest accuracy of the five, when speed matters less |
Each of the five ResNets arranges its building blocks in four stages, conv2ₓ to conv5ₓ. In the Block type column, the numbers in brackets tell you how many building blocks each stage has. For example, ResNet-50 has [3, 4, 6, 3], so it stacks 16 bottleneck blocks in total.
Moving down the table, accuracy improves with depth, although each step adds a little less than the one before. On ImageNet, top-1 accuracy, which measures how often a model's top prediction is correct, rises from 69.8% for ResNet-18 to 76.1% for ResNet-50 and 78.3% for ResNet-152 with the original torchvision weights. Compute, however, grows quickly, since ResNet-152 needs about six times the FLOPs of ResNet-18.
Training recipes also make a big difference, and the newer IMAGENET1K_V2 weights in torchvision show this clearly. Using a new training recipe, they raise the top-1 accuracy of ResNet-50 to 80.9%, which beats the original ResNet-152 weights while using far less compute per image.
The skip connection idea also inspired other well-known models.
- Pre-activation ResNet, also known as ResNet v2, uses a new Residual Unit with pre-activation. Batch normalization and ReLU come before each weight layer, and with this design its authors reported improved results for a 1001-layer ResNet on CIFAR-10.
- ResNeXt builds each block from several parallel branches with the same topology and aggregates their outputs. The number of branches is called cardinality, and ResNeXt took 2nd place in the ILSVRC classification task the following year.
- Wide Residual Networks (WRNs) decrease depth and increase width. A simple 16-layer WRN outperformed much deeper, thin ResNets in both accuracy and efficiency.
For most projects, start with ResNet-50. Pick a smaller variant for lower latency or ResNet-101 for higher accuracy.
Where ResNet Fits Today
ResNet is widely used across computer vision. Today it plays three main roles, as a baseline, as a backbone, and as a feature extractor.
A Strong Baseline and Backbone
ResNets remain the gold-standard architecture in numerous scientific publications, where they typically serve as the default model or as the baseline that new architectures are compared against.
A backbone is the part of a model that extracts feature maps from the input image for the rest of the model to use, and ResNet is widely used in this role, as these well-known models show.
- Faster R-CNN, a popular object detector, often uses a ResNet-50-FPN backbone, meaning ResNet-50 plus a Feature Pyramid Network (FPN). The torchvision library ships this as
fasterrcnn_resnet50_fpn, and the Roboflow two-stage detector guide uses the same setup. - DeepLabv3, a semantic segmentation model, adapts an ImageNet-pretrained ResNet-50 or ResNet-101 using atrous convolution, which adjusts the filter's field-of-view.
- The original DEtection TRansformer (DETR) used ResNet-50 and ResNet-101 backbones.
ResNet also creates useful image embeddings, which are numerical vectors that represent an image. If you remove the final fully-connected layer, ResNet outputs a feature vector from its global average pooling layer, with 512 dimensions for ResNet-18 and ResNet-34, and 2,048 for the deeper models. You can use these vectors for image search, clustering, or finding duplicate images.
ResNet vs. Vision Transformers and ConvNeXt
Vision Transformers (ViTs) split an image into fixed-size patches and turn each patch into a token through a linear embedding. A Transformer encoder then applies multi-head self-attention, which lets every patch attend to every other patch in the image. CNNs like ResNet instead have inductive biases built in, such as locality, where each convolution operates on a small neighborhood of pixels, and translation equivariance, which means that when an object moves in the image, its features move by the same amount in the feature map.
These biases help most when data is limited, and on mid-sized datasets such as ImageNet without strong regularization, ViTs reached accuracies a few percentage points below ResNets of comparable size. When pretrained on 14M to 300M images and then transferred to smaller benchmarks, however, ViT attained excellent results compared to state-of-the-art CNNs, showing that large scale training trumps inductive bias. You can also train and deploy a ViT classification model with Roboflow.
On the CNN side, ConvNeXt gradually modernizes a standard ResNet toward the design of a vision Transformer, using only standard ConvNet modules. The resulting models compete favorably with Transformers in accuracy and scalability, outperforming Swin Transformers on COCO detection and ADE20K segmentation.
Object Detection and RF-DETR
On its own, a ResNet classifier predicts one label for the whole image and does not output bounding boxes, but it can serve as the backbone of a detector, as in Faster R-CNN and DETR. Roboflow's RF-DETR is a light-weight, real-time detection transformer built for this task, and it uses a pretrained DINOv2 vision transformer backbone instead of a ResNet. Its largest model, RF-DETR (2x-large), is the first real-time detector to surpass 60 AP on COCO, where AP, or average precision, is the main metric for object detection.
ResNet remains a reliable choice for classification, feature extraction, and backbones inside larger models, while newer architectures hold the top results on benchmarks such as ImageNet and COCO.
Using and Training ResNet in Roboflow
Roboflow gives you several ways to use ResNet, whether you want to run a pretrained model, train a classifier on your own images, or upload weights you trained elsewhere. You can also deploy ResNet in the cloud or on edge devices and add it to multi-step applications with Workflows. The table below sums up each option, and the sections after it explain them one by one.
| Way to use ResNet | What it does | Best for |
|---|---|---|
| Run a pretrained model | Runs ImageNet-pretrained ResNet in the cloud or on your own hardware | Quick tests with ImageNet classes |
| Train a custom classifier | Trains ResNet18, ResNet34, ResNet50, or ResNet101 on your labeled images | Your own classes |
| Upload your own weights | Brings a ResNet trained elsewhere into Roboflow | Teams with their own training code |
| Deploy a custom model | Serves your ResNet in the cloud or on your own hardware | Production apps and edge devices |
| Build it into a Workflow | Adds ResNet as one block in a multi-step app | Detect-then-classify pipelines, video, and batch jobs |
Run a Pretrained ImageNet ResNet
The fastest way to try ResNet is to run a pretrained model. Roboflow hosts four ImageNet-pretrained ResNet models with the model IDs resnet18, resnet34, resnet50, and resnet101, and each one sorts an image into one of the 1,000 ImageNet classes.
Option A - Use the Serverless Cloud API: The Serverless Cloud API runs the model in the Roboflow cloud, so all you need is a Roboflow API key and no hardware of your own.
import os
from inference_sdk import InferenceHTTPClient

client = InferenceHTTPClient(
    api_url="https://serverless.roboflow.com",
    # or "http://localhost:9001" when self-hosting
    api_key=os.environ["ROBOFLOW_API_KEY"],
)

result = client.infer(
    "https://media.roboflow.com/notebooks/examples/dog.jpeg",
    model_id="resnet50",
)
print(result["top"], result["confidence"])
Option B - Run it on your own machine: Start a local Roboflow Inference server with pip install inference-cli && inference server start, then change api_url in the code above to http://localhost:9001 (Run a model locally). The same server also runs on edge devices like NVIDIA Jetson.
Option C - Run it inside your Python code: The inference-models package loads ResNet directly with no server, and the pretrained ImageNet weights do not need an API key.
# pip install inference-models
import cv2
from inference_models import AutoModel

model = AutoModel.from_pretrained("resnet50")
image = cv2.imread("dog.jpg")
prediction = model(image)

top_class_id = prediction.class_id[0].item()
print(model.class_names[top_class_id])
ResNet is also fast, and using Roboflow Inference on one NVIDIA L4 GPU, Roboflow measured an average of 1.4 ms per image for resnet18 and 3.7 ms for resnet101. If you prefer Hugging Face Transformers, How to Use ResNet-50 shows how to run the pretrained ResNet-50 checkpoint in a few lines of Python.
Train a Custom ResNet Classifier in Roboflow
ImageNet classes rarely match real projects, such as grading fruit ripeness or finding packaging defects, so you will usually want to train ResNet on your own images. Roboflow Train supports ResNet directly for classification projects.

In the Select Architecture step, ResNet sits next to DINOv3 and ViT, and its Model Size dropdown offers ResNet18, ResNet34, ResNet50, and ResNet101. ResNet-152 is not in the list, so ResNet101 is the deepest choice.
Compared with ViT, the app notes that ResNet trains and runs faster but with lower accuracy. ResNet also uses the Apache 2.0 license, which allows commercial use.
- Create a classification project, then upload and label your images with Roboflow Annotate.
- Generate a dataset version, adding preprocessing and augmentation if you need them.
- Click Custom Train and choose ResNet in the Select Architecture step.
- Pick a model size from the dropdown, then start training.
- Watch the training loss and validation accuracy as the model learns.
For classification, Roboflow starts training from an ImageNet checkpoint, which is transfer learning in action. Because the model already knows general visual features, it only needs to learn your new classes.
After training, your model gets its own model ID, made of your project name and version number, such as your-project/1, and you can deploy it in all the ways described below.
Upload Your Own ResNet Weights
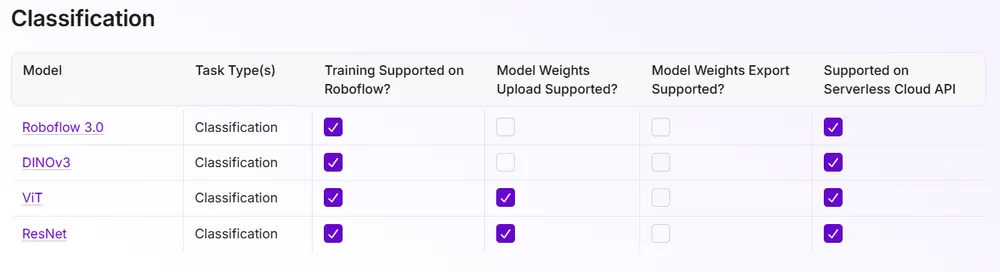
If you already trained a ResNet with your own code, you can still bring it into Roboflow, since uploading custom ResNet weights is supported, as the supported models table shows. After the upload, you can deploy the model through Roboflow like any other model.
Deploy a Custom ResNet Model
Once your model is trained or uploaded, you can run it in several places.
- The Serverless Cloud API runs it in the Roboflow cloud, using your own model ID in place of
resnet50in the code above. - A Dedicated Deployment runs it on private cloud servers that Roboflow manages for you.
- Roboflow Inference runs it on your own computer or an edge device like NVIDIA Jetson, using your API key to load the custom model.
- The inference-models package can also load your custom model inside your Python code.
Build ResNet Into a Workflow
Roboflow Workflows lets you build computer vision applications in your browser by connecting models and processing blocks. In this example, we connect our trained ResNet50 classifier to a Classification Label Visualization block to display its prediction directly on the input image.
The Workflow below takes an image, passes it to the Model for classification, and sends both the image and the predictions to the visualization block. It returns the classification results and an annotated image.

To choose the classifier, select your trained Model in the model-selection dialog. Here, I use Juice Box Quality Assurance, a ResNet50 Model trained to distinguish acceptable juice boxes from four straw-related defects.

Configure the Classification Label Visualization block to display Class and Confidence, then run the Workflow on an image. The output overlays the highest-confidence class and its confidence score on the original image. Because ResNet performs image-level classification, the result is a label for the entire image rather than a bounding box around an object.

Once you have validated the results, you can run the Workflow through the Roboflow Serverless API, on a Dedicated Deployment, or on your own hardware using Roboflow Inference. Workflows also supports video files and live camera feeds, while Batch Processing provides a managed, no-code option for large collections of stored images and videos.
Self-Hosting Is Free
Running models on your own hardware is free on every Roboflow plan, because self-hosted inference does not use credits.
Conclusion
ResNet's big idea is simple. Each block learns only a residual, the small change its input needs, and that makes very deep networks much easier to optimize. This idea still powers fast classifiers, trusted baselines, and backbones today. Sign up for a free Roboflow account to train a ResNet classifier on your own images and deploy it with Workflows.